Friday, August 7, 2009

Blueberry cupcakes

I bookmark recipes from cooking blogs all the time. I have to make myself go through the bookmarks just to remind myself what I have bookmarked, so I won't forget to try all the yummy things out there. I got some fresh blueberries a while back, but didn't really have a plan for them, so I froze them to use later. Yesterday, we were at home (for the second day in a row) and my sweet angels :) were getting a little stir crazy, so we got in the kitchen together.

I found this recipe at How To Eat A Cupcake
Blueberry Cupcakes (plus her specific directions)

1/2 cup (1 stick) unsalted butter, room temperature
1 cup sugar
2 eggs
1 1/2 cups all-purpose flour
1 teaspoon baking powder
1/2 teaspoon salt
1/3 cup milk
2 teaspoons vanilla extract
1 1/2 cups fresh or frozen blueberries

Preheat the oven to 350 degrees F. Insert liners into a regular muffin pan.
With an electric mixer on medium speed, cream the butter and sugar together in a large bowl until light and fluffy, about 3-5 minutes. Add the eggs (one at a time) to the creamed mixture and beat well.

In a separate bowl sift together the flour, baking powder, and salt.

Beat portions of the dry ingredients into the cream mixture alternating with the milk.

*Lick the beaters!!!!!!* Mix for 3 minutes (I don’t know why the recipe says this. It’s not a good idea. I only mixed until the flour was almost fully incorporated.). With a spatula, fold in the vanilla and blueberries.

Fill cupcake liners 1/2 to 3/4 full with batter.

Bake for 20-25 minutes (mine were done at 18) or until a toothpick inserted in the center comes out clean. Cool cupcakes in the pan.


I frosted them with a regular vanilla frosting. She made an awesome looking blueberry buttercream, but I was already out of blueberries. YUM! Not blueberry muffins, blueberry cupcakes!

Thursday, August 6, 2009

Easy BBQ Chicken

I love this recipe for so many reasons:
- it's in the crockpot, which makes things easier on me
- it uses chicken quarters or chicken thighs, which are cheaper
- it's barbeque!!

I never used to buy chicken on the bone- only boneless, skinless chicken breasts. Well, that is definitely NOT the cheapest option as far as chicken goes. When I started paying attention to my groceries and trying to buy 2 weeks of groceries under $175, buying a couple of packages of boneless, skinless chicken was not helping. My husband doesn't like eating chicken from the bone, but he does like dark meat. In the last year I realized how much I can cook with bone-in chicken, and you don't have to eat it off-the-bone. If you put bone-in chicken in the crockpot, it will get so tender, it falls off the bone. It's so moist and yummy! I have also started buying whole chickens and roasting them, then shredding them to pieces for at least 2 different meals.

I didn't find this recipe anywhere, but I'm sure someone else has done it before. Chicken, barbeque sauce and a crockpot. That's all you need!!
I used chicken quarters, the leg and thigh are connected. There were 3 in the package. Mine were even still frozen. I placed the chicken in the crockpot, seasoned it with salt and pepper. Then, pour your favorite sauce over the chicken (save some sauce for later). Turn on low. Mine was ready after 6-7 hours. It's not super pretty, and your hands get messy, but I think it's a great meal!
I drained the chicken from the crockpot and put in this dish.
I let it cool for a few minutes before I started shredding.
I used tongs and put all the meat in this bowl.
It literally falls off the bone, and comes off very easily.
I mix the shredded meat with a little more barbeque sauce. To serve, I put some chicken on a soft roll and more barbeque sauce, for me. My husband wanted a slice of cheese.

Saturday, July 25, 2009

Gran's Mac and Cheese

I am a mac and cheese lover, but not a mac and cheese snob. I am just as happy eating Kraft mac and cheese as I am eating homemade. I just love it, either way!!
My mom makes a cheese sauce first (which can also be used on top of broccoli), then adds it to cooked pasta and covers it in shredded sharp cheese. Bake it and you have some easy mac and cheese!!

Macaroni and Cheese
Cheese sauce:
2 Tbsp. butter
2 Tbsp. flour
1 cup whole milk
1 heaping cup of sharp cheddar cheese (sharp or extra sharp- anything less will be bland)
salt and pepper to taste
elbow macaroni or any small pasta
more shredded sharp cheddar cheese for top

Melt the butter in a saucepan.
Add the flour and stir to combineSlowly pour in the milk and stir until it thickens up. Add shredded cheese and stir until melted. Season with salt and pepper.
That's it!!!! Now you have a yummy cheese sauce to pour over vegetables,
or use it instead of Hollandaise for Eggs Benedict.
I cooked a package of medium shells and mix with the cheese sauce.
Pour into a baking dish and top generously with shredded sharp cheddar (Seriously. Use the sharp cheddar. Mild cheddar just does not have enough flavor for this dish)
Bake for 20-30 minutes, until cheese has melted.

Easy Cheesy Manicotti

I used to make stuffed shells and manicotti and lasagna rolls- all kinds of stuffed pasta, but we got so tired of it!! For the first few years of our marriage, I didn't have a very big selection of recipes, and we loved Italian food so much, I made those kinds of dishes alot. But, we haven't had it in years- seriously!!
I saw a great recipe for easy manicotti stuffed with string cheese at Heidi's blog, and I thought that it would something fun for the kids to help me with, and it would be yummy!! I made a batch (12 manicotti) and split it into 2 dishes. I froze one for later, and served the other.

Easy Cheesy Manicotti
1 package manicotti shells
1 package string cheese
1 lb. ground beef, browned and drained
simple tomato sauce

First, I made the sauce and let it simmer. Then, I browned the beef. After draining the beef, I added it to the sauce. Then, I cooked the manicotti shells. After they cooled, it was assembly time. Here, my lovely assistant will show you how we stuffed and arranged the manicotti.
Top with shredded mozzarella and bake for 30 minutes at 375. YUM!!

**While we are on the subject of Heidi's blog, and ground beef recipes (I am always collecting new ground beef recipes), I made these meatballs last night and they were great!!! I highly recommend them :)

Monday, July 20, 2009

Cheesy Garlic Bread

I saw this on another cooking blog, and bookmarked it immediately. Err, well, apparently I DIDN'T bookmark it because I can't find the bookmark nor can I remember which site I was at. I have found and started following several more cooking blogs recently, and so I don't know which one it was. Well, if it was your cooking blog, feel free to take the credit.

Cheesy Garlic Bread
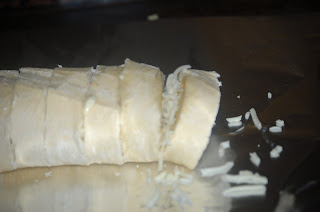
one loaf of bread, sliced- but don't slice all the way through to the bottom
soft butter, mixed with dry or fresh herbs (whatever you have)
mozzarella cheese (the original post used swiss cheese)

I put almost a whole stick of softened butter in a bowl,
and mixed in garlic salt, and some herbs I had on hand.

Slice the bread, but don't slice all the way through. The bread should still be connected.
I used a small spautla, and spread some of the garlic herb butter in each little pocket, so there is butter on each side of the bread. Then, I stuck some shredded mozzarella in each pocket. The original recipe used Swiss cheese and she had a larger loaf of bread (which would definitely work better, but this was all I had. I used one of those small sourdough loaves) and put half a slice of Swiss in each pocket.
I spread the rest of the butter on top of the loaf and covered it with foil. The oven was at 350.
Cover with foil and I baked it for 15 minutes. Then, if you want, you can take the foil off, and bake for a few minutes more. The top will get crispy that way. This was good. I didn't put enough cheese in, but my pockets weren't very big. I will definitely use a regular size loaf of bread, and it will be even better next time.

Thursday, July 9, 2009

Fish Tacos

In the summer, more than any other time, I want fish. I love salmon, but I only get it when it's on sale. Tilapia is a great choice, because it's cheaper! I like to saute the tilapia, but it will fall apart a bit. So, I started serving it with corn tortillas and a creamy sauce and, voila- fish tacos!!

Season the tilapia with salt and pepper.
I added herbs, olive oil, chopped garlic for marinating.
Sauce: I like a creamy sauce. I mixed Green Goddess dressing, mayo and Parmesan cheese.
After the fish marinated for at least 30 minutes, I sauteed it with some sliced onions.
I heated up some corn tortillas, shredded some mozzarella cheese and I wished I would have had some avocado's and lettuce!!! It was yummy enough with the sauteed onions, fish, cheese and sauce. We will be having this more this summer, for sure.

Monday, July 6, 2009

Easy Omelets

We love breakfast in our house, but my husband and I favor different items. I love french toast, blueberry muffins, and sausage biscuits. He loves omelets, scrambled eggs with all kinds of things in it and pancakes. I recently tried an omelet, and it worked out pretty good. The key I think is a nonstick pan. Mine is a 19.99 from Bed, Bath n Beyond one- nothing fancy, but it always makes great eggs and never sticks!!

nonstick pan
3-4 eggs
butter
mushrooms, onions (whatever you want in your omelet)
cheese

Beat eggs in a bowl. Season with salt and pepper.
Saute your onions, mushrooms or whatever veggies you are using.
They need to be totally cooked before you add them to the omelet,
because you add them at the end.
Heat skillet to medium high and put a pat of butter in skillet.
Pour eggs to totally cover bottom of skillet
Move sides of eggs away from pan, then tip pan to let uncooked eggs tip over and fill in the pan.
When almost all the way set, add veggies to one side of omelet. Sprinkle cheese over whole thing.
My hubby likes cheese!!
Flip one side of eggs over onto the side with veggies on it.
Slide onto a plate. Sprinkle the top with more cheese :)

Sunday, July 5, 2009

4th of July food fun- An Exchange program

If there is one positive things to come out of this blogging, I have made friends I never would have "met" otherwise. I started my personal family blog in the fall of '07, and have loved reconnecting with old friends and getting to know some new ones.
Even though I am new to the cooking blog scene, there have been several people that found me and continue to check in and actually leave comments! One sweet friend is Sonya. She is an American living in The Netherlands, and has a cooking blog. She found me and started commenting, so I started reading her blog. She does a great job of learning and bringing in the Dutch culture, but she frequently laments how hard it is to get good American items. They are either not available or ridiculously overpriced. She drives to Germany just to get chocolate chips!!!!
So I proposed an exchange. I would send her items I could get here easily and cheaper, and she would send me fun Dutch treats. Let's be honest- I will more than likely never make it to The Netherlands, but now I feel like I have!!! I sent her a package last month, and I just got my package of Dutch treats a few days ago. I had my family over last night to do fireworks (we live outside city limits), and we opened the box and tried all the treats. It was so fun! We pretty muchly enjoyed everything, and it is interesting to see how other people eat.

Our package of goodies!!

Sonya's 2 favorite cookies from The Netherlands.
I loved the waffle cookies with a caramel-like filling.
Lots of yummy lollipops for the kiddos to eat. Even the brown salty caramel lollipops weren't that bad. Apparently, they are crazy about salty treats over there.
A cola flavored lollipop

My sister made the awesome brownie burgers that I saw on Bakerella. She did a GREAT job- they looked perfect and they were so yummy!! I want to do those myself, and the yummy sugar cookie fries.