Monday, March 16, 2009

Amish Friendship Bread

This has been the most fun!!! I got a "starter" from one of my husband's co-workers several weeks ago, and have been baking delicious bread every 10 days ever since!!! After I made my first batch, I kept a bag for myself, so I could make more 10 days later. The first batch, I made the original Friendship bread from the recipe, with the cinnamon sugar topping. It's moist, sweet and oh-so good!! Then, I saw a post on How To Eat A Cupcake- she had gotten a starter, too!! She made hers, but did some variations on her bread. She made a lemon blueberry that is SO good, I made that one on my second go 'round. I found a very informative site that gives the instructions, LOTS of variations, and you can purchase a starter from them if you can't find anyone to give you one.
I HAVE A STARTER TO GIVE YOU!!!
(precious 3-year old NOT included!)If you want one, I have 2 right now, and will have 3 more in 10 days. Email me at icooktexasATgmailDOTCOM with your address and I will send you one.
On Day 10, you bake the bread and separate it out to give to 3
(or 4 if you don't keep one for yourself) of your friends.
Add milk, flour and sugar to the batter from your bag. Put it in a glass bowl. No metal.
Using one gallon bags, label each bag with the days so your friend will know what day they are on. I label mine with Day 1, Day 6, and Day 10.
Day 6 you add ingredients, and Day 10 you bake it.
Take one cup of the batter,
and pour it in the bag. I keep one for myself, so I can make more bread,
and give the other 3 away.
With the batter that is left after dividing it into 4 bags, add the ingredients per your instructions.
This is where it gets fun. The original recipe calls for box of vanilla pudding and cinnamon sugar to sprinkle on top. We made it that way the first time, then we have been mixing it up since then! I used lemon pudding and a carton of blueberries for the lemon blueberry bread,
and today, my daughter suggested chocolate chips. I tossed them in flour, so they won't sink to the bottom of the bread,
and added them to the batter.
You can use one bundt pan or two loaf pans.
Bake for 1 hour- 1 hour and 15 min. at 325.
It's so good, y'all! A nice, moist, sweet bread that is great for a snack or for breakfast! I got it out of the pan a little early, so I could get pictures for you. I even spread a little butter on a warm piece and ate it for you. Just so I could tell you that-it's heaven, people.

Cupcake Pops!!

I ventured into the world of cake balls, cake pops, cupcake pops- whatever you want to call them- this weekend. My husband had a pot luck deal at his work, and signed up to bring dessert. Then, last weekend, my sister made cake balls and he politely requested that I make them for his pot luck. Arrrgh!!! These are a presentation dish, they are supposed to look cute. I am no good at the presentation side of things. I can make things taste good, but not look good.
So, I went to Bakerella. She seems to have cornered the market on the cake pops, and has great tutorials on how to do it. I thought the cupcake pops looked cute, and she said to try those if you are a first-timer, so I did.
First, let me say that I followed her recipe and tutorial to a T, the pictures and instructions were great and detailed. Use her directions and pictures if you are going to attempt this.
She knows what she's talking about. I am just sharing my experience! Here is my first attempt at cupcake pops- in pictures!!!

Bake a cake- can be from scratch or the box.
Let it cool completelyCrumble up the cake
Add frosting. I used my leftover vanilla frosting from the banana cake the other night.
It was probably 1 1/2 cups. Mix together with the back of the spoonRoll into balls, about 1 1/2" ballsI got 46 balls out of mine. Let refrigerate for several hours.Roll the balls into more of an oval shape. Fit it in the bottom part of the cookie cutter, but let the top still stick out. When it comes out, It will look like a mini cupcake. (well, it's supposed to!!!!)
Put these in the freezer for 15 minutes or so. Get your dipping and decorating supplies ready.Dip the bottom halves in melted chocolate barkLet it sit and dry for 15 minutes before you dip the top halves.
Dipping the top half of the pop in the melted white chocolate barkYou can use a toothpick to help cover all the areas with the white chocolateI sprinkled them with green sprinkles, and pressed a green M&M on top
My St. Patrick Day Cupcake Pops!
These taste like a very moist chunk of cake. The size is precious, and although mine are not perfect, I still think the cupcake pop idea is super cute. And, I will do them again. I think that is the real test. If you will attempt something like this again, then obviously it wasn't that bad- and then end result is yummy!!!! Thanks, Bakerella!

Sunday, March 15, 2009

Banana Cake

I buy my groceries to get us through 2 weeks at a time. I had a friend ask me one time, What about fruit? Meaning, fresh fruit doesn't last that long, so what do you do about feeding your family fruit? This is my fruit plan- we eat the fresh fruit first, and then we start eating canned fruit until it's time to go to the grocery store. I get the store brand, in juice (not syrup), canned fruit which is cheap and still pretty healthy.
Bananas are my nemesis, though. My family loves bananas. If I buy one bunch of bananas, they are gone in 2-3 days. But, if I go all out and buy a few bunches, we never get through them all and I end up having to throw some out. NO!!! Money...being wasted...can't take it...

So, I am mean and just buy 2 small bunches and when the bananas are gone, they are gone. Wait until the next grocery trip. One more banana thought, and I will get to the recipe. I buy my bananas at Sam's- they are 1.77 a bunch. Yes!!!

This recipe was found for this reason. The bananas were on their way to "I'm not gonna eat that one", and I refused to throw them out. Then, I had a thought. Don't most recipes ask for ripe, super soft bananas? So, I looked in my favorite baking cookbook, Betty Crocker's Picture Cook Book. It is an exact replica of the original Betty Crocker cook book published in 1950. The photos and tips are pretty humorous, but everything I've made has turned out great. This is my go-to recipe when I have a few bananas that need to be used, but nobody wants to eat.

Betty Crocker's Banana Cake
1/2 cup shortening
1 1/2 cups sugar
2 lg. eggs
2 cups all-purpose flour
1/4 tsp. baking powder
3/4 tsp. baking soda
1 tsp. salt
3/4 cup buttermilk
1 cup mashed ripe bananas, about 3
1/2 cup chopped nuts, optional

Preheat oven to 350.
First off, I hardly ever have buttermilk. I use a substitution
Regular milk with a splash of vinegar (or lemon juice)- let it sit

Mash the bananas. I got my little monkeys to help.
Cream the shortening and sugar together first. Then add in eggs.
Sift together the dry ingredients. Mix the buttermilk and bananas.
Add the dry ingredients in alternately with the banana mixture
Let monkey #1 lick the beater.
This recipe is for a 13x9 pan, or 2-9" layer pans
bake for 35 minutesI frosted it with my vanilla frosting

Saturday, March 14, 2009

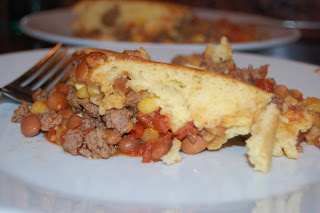
Tamale Pie

I have posted this recipe before, but it was in the crockpot. This time I did it in the oven.
We still have the rain/cold going here in Forks..I mean, Texas- so I wanted to do another cold weather favorite. I have made this several times before, but always in the crockpot. Yesterday was grocery shopping day, with a little gymnastics class thrown in, so I wasn't home early to get the tamale pie going in the crockpot. We finally got home at 3, after a fun day of errands- did I mention it was 40 degrees and raining all day?- so I made this dish in the oven, instead of the crockpot. It was originally meant for the oven, but got adapted to the crockpot, so I figured it would turn out ok. We were cold, tired and had wet feet. This dish was perfect!! It's easy to throw together, so I wasn't in the kitchen all evening, and it warmed us up!

Tamale Pie
1 lb. ground beef, browned and drained
1 can pinto beans, drained and rinsed
1 can hominy, drained ( I love hominy- you can totally use corn)
1 can diced tomatoes (I drain them slightly- I don't like the filling to be too juicy)
1 can chili (totally optional. I like how it thickens up the filling, and makes it heartier)
paprika
chili powder
salt and pepper

Cornbread crust:
3/4 cup cornmeal
1 1/4 cup flour
1/4 cup sugar
1 egg
1 cup milk
1 tsp. baking powder

Mix cornbread ingredients in a separate bowl, set aside.

Mix browned beef, canned goods (remember to drain!) and season well. I was pretty liberal with the paprika and chili powder- those are not spicy spices, but they add good flavor. I used a deep baking dish for this, I couldn't remember how much the cornbread rose, and I didn't want it spilling over the edge.
Mix well, and smooth the meat mixture to an even layer.
Pour cornbread topping over meat mixture. Bake for 40 minutes at 400.
The thing I love about this recipe, and I say this about alot of my recipes, is the flexibility. You could make this a vegetarian dish, and just add more canned beans and veggies. You could use any kinds of bean you want- whatever you have on hand. It's very flexible, this is simply the way we like it.

Roasted Carrots

Another easy side dish!! Last week, it was roasted potatoes- and that even invoked a comment from a REAL food blogger. Sweet!!!
As you can tell, I love roasting...well, anything. It's a quick way (read:easy) to prepare foods, and pretty much everything I have tried is great. But, carrots. Now THAT is something that surprised even me. It took me seeing it in a magazine before I got the idea to roast carrots, and in the magazine it was those miniature carrots (see picture below)- which I have never actually seen, but would love to try. Where do you get those? Do I need to go to my fancy grocery store?
When you roast the carrots, they get a little sweet, and soft- but not mushy. My husband absolutely LOVES these, and I serve them often- any way that I can get him to eat veggies...

Roasted Carrots
carrots
salt and pepper
olive oil

Peel carrots, and chop in large chunks. Sprinkle with salt, a little pepper and drizzle with olive oil. Toss to coat (I usually use my hands- messy, but easy!)
Bake at 375 for 30 minutes. You can flip them around halfway through,
and I drizzled mine with more olive oil.